

I noticed Megabonk about a week after launch and spent that first weekend GLUED to it like everyone else.
It felt like I was playing Vampire Survivors or Brotato for the first time.
And like you, I died a lot, but that’s the point, right? …Right? 👀
If you’ve read any of my other articles, you’ll know I love collecting Reddit threads and using them as a basis for writing guides like this one.
So here’s a massive community overview of Megabonk tips.
Hope you enjoy 🙂
TL;DR: The Top Megabonk Tips at a Glance
Getting the most out of Megabonk comes down to a few repeatable principles: build around your character’s passive, get the Holy Trinity (XP + Curse + Luck Tomes), and keep moving.
Here’s a quick overview of what I collectively noticed on Reddit.
Top Megabonk Tips at a Glance
Mobility first, always
Most characters can't clear Stage 1 without extra speed and jumps
One Shield tick absorbs a full hit
5 shield cancels a 100 damage hit entirely; take one from a charge shrine early
Always bust pots
Every pot gives XP, gold, or power-ups; never walk past one
Build Luck before opening paid chests
Luck affects chest item quality; wait until at least 15–30% before spending gold
Don't banish Moldy Cheese or Unstable Transfusion
Both are strong early DPS items the community repeatedly regrets removing
Balance weapon upgrades against tome upgrades
Weapons = short-term power; tomes = long-term scaling. Don't neglect either
Projectile count upgrades are massive early
The first +1 projectile effectively doubles your damage on most weapons
Crit past 100% converts to crit damage
The excess doesn't cap; it keeps scaling your crit multiplier into the late game
Don't run Holy Trinity as a beginner
It's a leaderboard strategy; Curse Tome will kill your run before the build comes online
Restart without guilt if the first three minutes are bad
The opening sets the arc for the whole run; bad starts rarely recover
Top 10 Megabonk Tips From The Community
I went through eight Reddit threads from r/MegabonkOfficial and r/PaymoneyWubby covering tips, beginner questions, and build advice.
The patterns below are the things that kept coming up across multiple threads independently; not one person’s opinion, but the community arriving at the same conclusions over and over.
1. Mobility first, always
Movement speed and extra jumps come up in nearly every thread.
u/zenitharchon put it plainly: most characters can’t clear Stage 1 without additional speed.
You need to reach shrines, pots, and interactables before the boss spawns, and you need to escape bad positions during swarms.
The advice that was repeated most: get at least two extra jumps early, and take movement speed whenever nothing else is more urgent.
u/gallandof credited extra jumps as the single change that stopped him from dying every run.

2. One Shield tick absorbs a full hit, no matter the damage
This one surprised me when I first saw it, but multiple threads confirmed it.
u/wo0topia explained it clearly: if you have 5 shield and take 100 damage, the 5 shield cancels the attack entirely. It doesn’t scale with the hit. One charge shrine Shield upgrade early is considered essentially mandatory by most experienced players; it’s the cheapest possible one-shot protection.
Don’t stack it beyond that unless you have a specific reason.
3. Don’t open chests until your Luck is built up
u/BalusBubalis set a specific benchmark: at least 15% luck, ideally 30%+ before paying for chests.
The reasoning is straightforward: Luck affects chest item quality, so spending gold on chests before you’ve built Luck is burning currency for worse outcomes.
Free chests from Keys are fine earlier; it’s the paid ones you want to hold on to.
4. Don’t banish Moldy Cheese or Unstable Transfusion
This came up in two separate threads from players who had banished both and regretted it.
Moldy Cheese applies poison on hit, which ticks away at boss health passively and makes early-game survivability significantly easier.
u/where_is_the_camera called it the difference between making it out of Round 1 or not.
Unstable Transfusion reduces an enemy’s total HP cap over time (the red bar you see creeping from the left of a boss’s health bar), and when your damage hits that point, it’s an instant kill. Both are worth keeping.
5. Balance weapon upgrades against tome upgrades; don’t neglect either
u/zenitharchon framed it well: weapon upgrades determine your damage and survivability in the short term; tomes determine your scaling in the long term.
If you’re struggling to kill enemies, prioritize weapons.
If you’re clearing comfortably, invest in tomes.
Several threads warned against going all-in on tomes early (especially Holy Trinity) without enough weapon levels to actually survive the difficulty spike that follows.
6. Projectile count upgrades are massive early
Multiple comments across threads flagged this as one of the most undervalued early upgrades.
The first +1 projectile count effectively doubles your damage on most weapons.
u/SendMePicsOfMILFS listed it as one of the three most important early stats alongside Shield and extra jumps. Look for projectile count upgrades in charge shrines early; they have an outsized impact relative to their cost in the first stage.
Also, bous points for that name lmao.
7. Restart without guilt if the first three minutes are bad
u/BalusBubalis said it directly: the first two or three minutes set the arc for the rest of the run. If you haven’t hit basic benchmarks and don’t feel confident by that point, just restart.
u/FuryMoon echoed it: rather than waste 20 minutes on a half-baked run, cut it early and fish for a better start. This is a roguelite; RNG matters, and some starts are just doomed.

8. Always bust pots
Short but consistent advice. Pots give XP, gold, and power-ups.
u/BalusBubalis said, “Pots are the enemy, monsters are just the obstacles between you and pots.” Always interact with them as you move through the map.
9. Crit chance past 100% converts to crit damage
This is less obvious, and the game doesn’t explain it clearly.
Multiple comments in this r/MegabonkOfficial tips thread confirmed: once crit chance exceeds 100%, the excess converts to crit damage.
At 200% crit chance, you’re effectively doubling your crit multiplier. This makes Precision Tome and crit-stacking builds continue scaling into the late game rather than soft-capping.
10. Don’t run Holy Trinity as a beginner
This was consistent across threads.
u/jordan853 flagged it explicitly: Holy Trinity is a leaderboard meta strategy, not a beginner strategy.
The Difficulty Tome spike without the foundation to handle it kills runs fast and kills enjoyment faster.
Several experienced players recommended getting comfortable clearing Tier 1 reliably first, then introducing XP and Luck Tomes, and only adding Curse Tome once you understand how to manage the difficulty increase it brings.
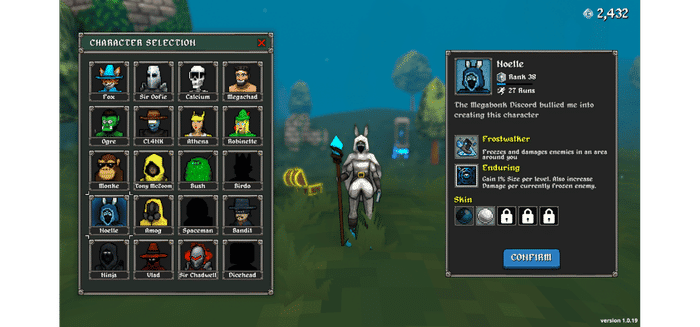
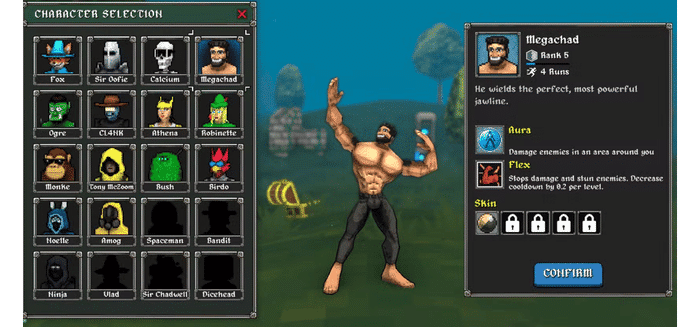
Megabonk Characters: Who Should You Pick?
Megabonk currently has 21 playable characters, each with a unique starting weapon and one passive ability.
Megabonk Character Tier List
Dicehead
Crit scaling via gambling passive (Dice)
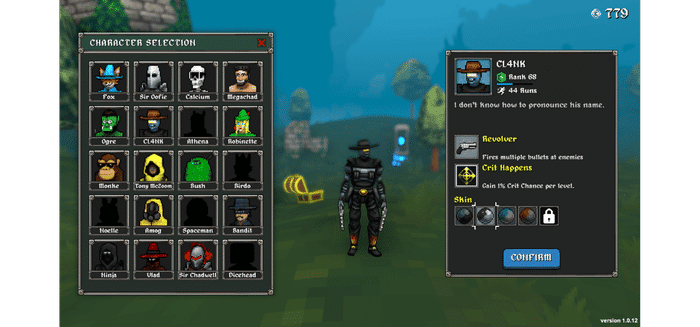
CL4NK
Crit/projectile build (Revolver)
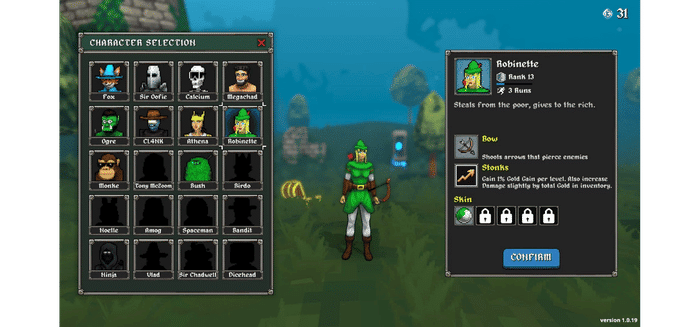
Robinette
Gold-to-damage scaling (Bow)
Megachad
AFK tank (Aura + Flex passive)
Bandit
Attack speed + execute (Dexecutioner)
Calcium
Speed-scaling DPS (Flamewalker)
Noelle
Size + AOE (Frostwalker)
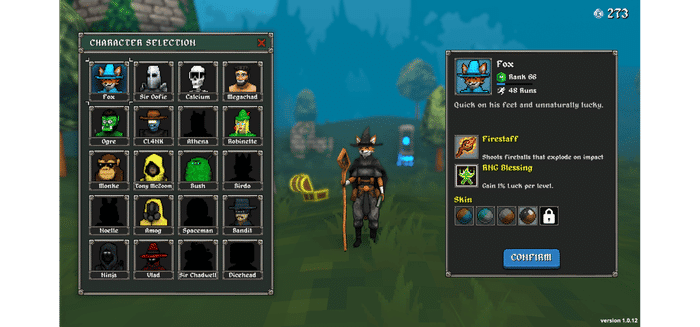
Fox
Luck-based RNG farming (Firestaff)
Roberto
Hoarder passive (free chest every 60s)
Sir Oofie
Armor tank (Sword) — best beginner pick
Monke
Mobility + projectile (Bananarang)
Tony McZoom
Speed + crit (fastest character)
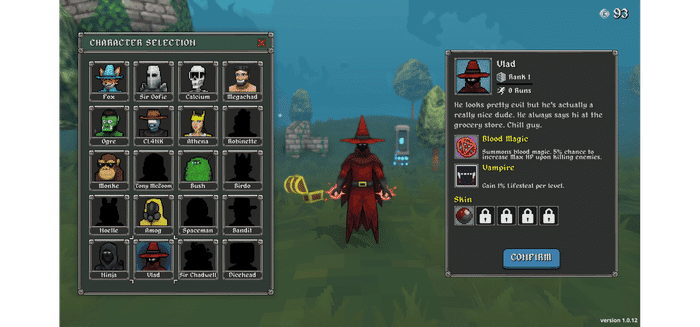
Vlad
HP-scaling sustain (Blood Magic)
Athena
Thorns + low HP (Aegis)
Spaceman
Black Hole (bugged XP passive)
Others
Situational or niche playstyles
Their passive is everything.
It shapes what tomes you want, what weapons synergize, and whether a given run feels coherent or completely off the rails.
The community has settled on a fairly consistent tier list across sources like Dexerto, Game Rant, and the Megabonk wiki, even if specific placements shuffle between patches.
One thing basically everyone agrees on: Dicehead, CL4NK, Robinette, and Megachad are the top four.
Here’s the quick breakdown before we get into the tier table:
- Dicehead: His Gamba passive lets rolling a 6 permanently increase crit chance, creating theoretically unlimited scaling. He remains S-tier.
- CL4NK: Gains +1% crit chance per level through his Crit Happens passive. Extremely consistent once his Revolver build gets going.
- Robinette: Her Stonks passive gives +1% gold per level, and her damage scales directly with gold held. Long runs reward her exponentially more than other characters.
- Megachad: His Flex passive blocks damage and stuns enemies on cooldown. Perfect for AFK-style builds and genuinely one of the most fun characters to watch wreck a map.
For beginners, the community consensus points to Sir Oofie and Fox, but then again, those are the starting characters.
Sir Oofie gets +1% armor per level, making him extremely hard to kill while you’re still learning positioning.
Fox brings +1% Luck per level and a ranged playstyle that keeps you at a safe distance.
Monke comes up a lot for newer players too; wall-climbing is a genuine mobility advantage, and the Bananarang is a top-tier starter weapon.hest every 60 seconds, which makes him excellent for long runs and particularly strong in the AFK challenge.
Best Megabonk Builds for Top Characters
The core principle behind the best Megabonk builds is simple: find your character’s passive, build around it, and make everything multiply rather than add.
The problem is, most players treat tomes as interchangeable, rather than as the architecture of their run.
From what I’ve seen, every successful build runs through the same foundational decision: Holy Trinity (XP + Curse + Luck Tomes) or a character-specific route.
The Holy Trinity creates a feedback loop where faster leveling gives better upgrades, better upgrades clear faster, faster clearing gives more XP, and more XP gives more levels.
For leaderboard runs, it’s practically required.
For newer players, it’s a trap.
Curse Tome makes difficulty spike fast, and without a defensive foundation, you’ll die around minute 8 confused about what went wrong.
The community’s standing advice: master a defensive build on Sir Oofie or Megachad first.
Once you’re comfortable surviving to the Final Swarm, introduce the Trinity.
I learned this the hard way and I’d rather you didn’t have to.
Best Megabonk Builds for Top Characters
Noelle
+1% size per level
Size, Damage, Quantity, XP
Frostwalker, Aura, Lightning Staff
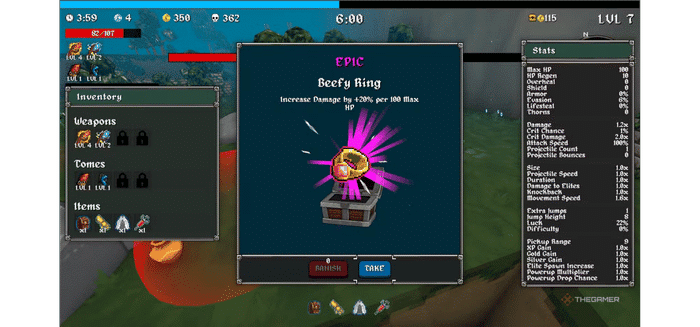
Beefy Ring, Spiky Shield
Fox
+1% Luck per level
Luck, Curse, XP, Damage
Firestaff, Aura, Flamewalker
Clovers, any legendary
Robinette
+1% gold per level; damage scales with gold
XP, Luck, Quantity, Damage
Bow, Lightning Staff, Dexecutioner
Green Credit Card, Gold Nugget, Boss Buster
CL4NK
+1% crit chance per level
XP, Precision/Crit, Quantity, Cooldown
Revolver, Bone, Sniper Rifle, Dexecutioner
Giant Fork, Forbidden Juice, Boss Buster
Vlad
HP scales with kills via Blood Magic
Lifesteal, HP, XP, Attack Speed
Blood Magic, Aura, Aegis
Leeching Crystal, Medkit
Calcium
Damage scales with speed; resets on hit
Agility, Attack Speed, XP, Damage
Flamewalker, Bone, Revolver
Turbo Socks, Evasion Ring
Megachad
Flex blocks damage and stuns on cooldown
XP, Attraction, Size, Shield
Aura, Aegis, Sword, Axe
Kevin, Mirror, Campfire, Idle Juice
Best Noelle Build
Noelle’s passive increases her size +1% per level, and her Frostwalker weapon creates a damage-and-slow circle around her.
The best Noelle builds lean into this hard: Size Tome widens the ring, Damage and Quantity Tomes stack on top, and she can clear entire screens without much input from the player.
She’s one of the more forgiving A-tier picks and a good stepping stone before you go anywhere near Calcium.
- Priority tomes: Size, Damage, Quantity, XP
- Best weapons: Frostwalker (default), Aura, Lightning Staff
- Key items: Beefy Ring, Spiky Shield
Best Fox Build
Fox gains +1% Luck per level through her RNG Blessing passive, making her the best character in the game for farming legendary items.
The strategy is simple: stack Luck and Curse Tomes early to maximize upgrade quality, then let whatever legendaries land do the heavy lifting.
Fox is fragile, though.
She’s not a tanky beginner pick despite showing up as a default character. Her builds can hit ridiculous power spikes, but only when the RNG cooperates.
On bad runs, she feels like being punished for someone else’s choices.
- Priority tomes: Luck, Curse, XP, Damage
- Best weapons: Firestaff (default), Aura, Flamewalker
- Key items: Clovers, any legendary
Best Robinette Build
Robinette’s entire identity is gold farming. Her Stonks passive adds +1% gold per level, and her damage scales directly with gold held.
By the third stage of a long run, with tens of thousands of gold stacked, she deals game-breaking damage numbers.
The build is: get XP Tome fast to level quickly, then stack gold-generating items aggressively. Green Credit Cards and Gold Nuggets are your highest priorities; the more gold you accumulate, the more damage Robinette’s passive converts it into. Her Bow is a strong wave-clearer that benefits from Quantity Tome for pierce and projectile count. She rewards patience; early game feels quiet, late game feels completely out of control.
- Priority tomes: XP, Luck, Quantity, Damage
- Best weapons: Bow (default), Lightning Staff, Dexecutioner
- Key items: Green Credit Card, Gold Nugget, Boss Buster
Best CL4NK Build
CL4NK is as consistent as it gets.
His Crit Happens passive gives +1% crit chance per level, which means the longer a run goes, the more his crit builds come apart at the seams (in a good way).
The best CL4NK builds stack crit-synergy items and high-projectile weapons so that crit chance is applied as often as possible. Revolver and Bone are the go-to weapons because they fire frequently. Sniper Rifle becomes excellent in CL4NK’s hands once crit chance gets high enough.
- Priority tomes: XP, Precision/Crit, Quantity, Cooldown
- Best weapons: Revolver (default), Bone, Sniper Rifle, Dexecutioner
- Key items: Giant Fork (megacrits), Forbidden Juice (crit scaling), Boss Buster
Best Vlad Build
Vlad’s Blood Magic increases max HP with kills at 5% per kill, which is lower than players expect.
If you’ve never played Vlad, his builds center on lifesteal to make that HP regenerate fast enough to matter. The community considers him a B-tier pick; high HP counts mean you survive more hits, but he’s slow out of the gate and requires specific items to feel good.
Also, lifesteal Tome is essential here.
Hitting 100% lifesteal means every projectile hit heals you, and poison DoT counts as continuous hits for the calculation.
If you’ve ever wanted to feel like an unkillable vampire, Vlad is your character.
- Priority tomes: Lifesteal, HP, XP, Attack Speed
- Best weapons: Blood Magic (default), Aura, Aegis
- Key items: Leeching Crystal, Medkit
Best Calcium Build
Calcium’s Speed Demon passive scales damage with movement speed, but his speed resets (halved) when he takes damage. Mobbing around on his skateboard is fun as hell.
From my experience, a clean Calcium run feels absolutely insane and a sloppy one feels like you’re getting punished every two seconds. The real caveat isn’t the skill floor though; it’s the late game. Staying in constant motion during the Final Swarm, when enemies come from every direction at once, is genuinely hard to sustain.
The best Calcium builds prioritize Agility Tome and evasion items above almost everything else. Flamewalker is perfect for him because it leaves fire trails as he moves, creating passive damage from his momentum.
Calcium + Flamewalker is a well-documented top-tier speedrun combo.
- Priority tomes: Agility, Attack Speed, XP, Damage
- Best weapons: Flamewalker (first grab if not default), Bone, Revolver
- Key items: Turbo Socks, Evasion Ring

Best MegaChad Build
Megachad’s Flex passive blocks damage and stuns enemies on a cooldown that decreases by 0.2 seconds per level.
At max level, you have near-permanent invulnerability windows, which makes the Kevin + Mirror combo so devastating once acquired.
Here’s why: Kevin (unlocked by getting three Leeching Crystals in one run) damages you but can’t kill you. Mirror reflects damage back to enemies and triggers invulnerability when you take damage.
Pre-patch, this made Megachad literally immortal, but post-patch, it’s “elite survivability” rather than true immortality. Still S-tier if you ask me.
From what I’ve seen, here’s the best non-exploit Megachad build: Aura as his core weapon, Size Tome to widen the damage field, Attraction Tome to collect XP without chasing it, and Shield Tome for passive survivability.
He’s also the go-to for the AFK Gaming Challenge (more on that below).
- Priority tomes: XP, Attraction, Size, Shield
- Best weapons: Aura (default), Aegis, Sword, Axe
- Key items: Kevin, Mirror, Campfire, Idle Juice
Megabonk Weapon Tier List: Best Weapons Ranked
Megabonk Weapons at a Glance
Total Weapons
29
Available by Default
7 — Flamewalker, Sword, Lightning Staff, Firestaff, Chunkers, Bone, Bow
Unlockable
22 via challenges, quests, or the Silver shop
Current S-Tier Core
Aura, Aegis, Dexecutioner, Flamewalker
Worst Weapons
Space Noodle, Mines, Chunkers
The meta shifted hard after versions 1.0.7 and 1.0.12 moved things away from the Kevin + Mirror immortality exploit toward a more skill-based game. Pro Game Guides’ weapon tier list (updated December 2025) is one of the most actively maintained external resources if you want a deeper breakdown.
From my research, here’s the broad community agreement on weapons, based on multiple tier lists and Steam threads:
- Aura: Hits everything around you simultaneously with zero aiming required. Pairs with nearly every character and every tome. Perfect for beginners and still dominant in competitive runs.
- Aegis: S-tier for survivability and tank builds. Blocks attacks and counters with shockwaves; cooldown decreases with Attack Speed upgrades.
- Dexecutioner: The essential boss and Spooky Steve weapon. Instantly executes any target on proc, and that proc rate scales with Attack Speed, making it absurdly powerful on Bandit.
- Flamewalker: S-tier for mobility builds. Leaves fire trails behind you as you move, creating passive AoE damage with zero input. Available by default; Calcium loves it.
- Black Hole: Critical support weapon in Tier 3 runs and boss fights. Pulls enemies into a central point, enabling CC-heavy builds to land concentrated damage. Pairs especially well with Dexecutioner.
- Hero Sword: Good raw damage but a slow attack rate, which limits its synergy with Attack Speed tomes and on-hit item effects. Most lists put it at B-tier.
- Space Noodle, Mines, Chunkers: The community’s consensus bottom tier. There’s debate on exact ranking but these three come up most consistently as weapons to avoid or skip.
Megabonk Weapon Tier List
Aura
Any character, AoE
No aiming required; beginner-safe and competitive
Dexecutioner
Boss kills, Spooky Steve
Execute proc scales with Attack Speed
Flamewalker
Mobility builds (Calcium)
Default weapon; fire trail passive AoE
Aegis
Tank/defensive builds
Blocks + shockwave; pairs with Shield Tome
Black Hole
CC/boss support
Needs positioning; pairs with Dexecutioner
Katana
Bandit, Calcium
High attack speed melee; RNG unlock (Tumbleweed drop)
Lightning Staff
Most builds
Solid consistent damage with Quantity Tome
Revolver
CL4NK, crit builds
Bounce shots, strong crit synergy
Bone
Default; crit builds
Improved knockback in v1.0.64
Shotgun
Close-range burst
Knockback upgraded in v1.0.64
Dice
Dicehead (best); viable on others
Crit scaling; RNG dependency limits universal ranking
Sword
Beginner, AFK builds
Default; reliable but slow scaling
Hero Sword
Melee builds
Good damage, very slow attack speed
Frostwalker
Crowd control
Freeze effect strong for CC; weak raw damage
Corrupted Sword
Damage builds
Hits hard; projectile speed scaling fixed in 1.0.64
Blood Magic
Vlad, HP builds
HP gain rate (5%) is lower than it looks
Space Noodle
Meme runs only
Community consensus: not worth the unlock grind
Mines
Situational only
Low damage output; rarely worth a weapon slot
Chunkers
Meme runs only
Knockback without the damage to back it up
Hero Sword
The Hero Sword has good base damage, but the slow attack rate is its core problem.
It doesn’t interact well with Attack Speed tomes, and most builds that want sword-style melee prefer the Sword (better knockback) or the Corrupted Sword (higher damage output).
It’s worth grabbing if your alternatives are bad; not worth building around unless you’re running a Size + melee combo specifically.
Anvil
The Anvil is an item, not a weapon, and it’s worth flagging because it shows up in community build discussions regularly.
Anvil upgrades a random equipped weapon; the impact is highly situational. Use it when your core weapon is already leveled and you want to push it further, not as an early-game priority.
Bloodmark
Bloodmark is an item that reduces enemy execution thresholds, making Dexecutioner procs happen at a higher HP percentage. If you’re running a Dexecutioner build (especially for Spooky Steve), finding Unstable Transfusion (which applies Bloodmark) is a priority. It’s the difference between executing enemies at 15% HP versus much earlier, and in boss fights that gap matters.
Megabonk Items, Mods, and Tomes Explained
Megabonk Items & Tomes Explained
XP Tome
+7% XP gain per level (cap: level 40)
All leaderboard builds; engine of every competitive run
Curse Tome
Harder difficulty; dramatically improves drop rarity
Experienced players only — deadly without a defensive base
Luck Tome
Improves upgrade quality at every level-up
All builds; completes the Trinity feedback loop
Cooldown Tome
+7.5% Attack Speed per level
Beginners, Bandit, CL4NK; great first tome for new players
Attraction Tome
Increases XP pickup range
Mandatory for AFK challenge; undervalued in regular runs
Lifesteal Tome
Heals on hit; poison DoT counts as continuous hits
Vlad, sustain builds; hit 100% for near-immortality
Agility Tome
Movement speed
Critical for Calcium; undervalued on everyone else
Duration Tome
Extends freeze and weapon effect duration
Dexecutioner, Axe, Sword builds; stronger post-1.0.12
Quantity Tome
More projectiles per weapon
CL4NK, Bandit, most builds; solid Curse Tome alternative for beginners
Size Tome
Increases weapon and AoE radius
Noelle, Megachad, Aura builds
Shield Tome
Passive shield that recharges between waves
Tank builds, AFK challenge; better than raw HP vs burst
Kevin
Megachad, Athena
Combine with Mirror; was literally game-breaking pre-patch
Mirror
Any with Kevin
Invulnerability on damage; Kevin + Mirror core combo
Boss Buster
Any boss-focused build
+15% boss/elite damage; essentially mandatory for Spooky Steve
Aegis Shield
Most builds
Consistent damage block; one tick absorbs a full hit
Za Warudo
Graveyard runs
Legendary; freezes time on fatal damage
Campfire
AFK, tank builds
Passive HP regen; crucial when you can't dodge
Idle Juice
AFK challenge
Doubles damage while standing still
Joe's Dagger
Attack speed builds
Capped at 2,000% post-patch; still strong
Gym Sauce
DPS scaling
Base damage multiplier
Leeching Crystal
Vlad, lifesteal builds
Collect three to unlock Kevin
Tomes
Tomes are your long-term scaling mechanism. Each one levels up individually and compounds across a run. The three Holy Trinity tomes (XP, Curse, Luck) form the backbone of every competitive build; the rest are character or situation-specific.
Do not run Holy Trinity as a beginner. The difficulty spike from Curse Tome without defensive foundations leads to deaths before the build even comes online.
Items to Know
A few items that get flagged across guides and Steam threads:
- Kevin: “25% chance to punch yourself on hit (cannot kill you).” Sounds bad; combined with Mirror, creates near-invincibility through damage reflection. The immortality exploit was patched; the combo is still elite-tier defensive.
- Mirror: Reflects damage to enemies when you take damage. The Kevin + Mirror core.
- Boss Buster: +15% damage against bosses and elites. Essentially mandatory for Spooky Steve.
- Joe’s Dagger: Attack-speed scaling item; was uncapped and broke leaderboards pre-patch, now capped at 2,000% per dagger. Still strong.
- Za Warudo: Legendary item that freezes time on fatal damage. Required by some players for Spooky Steve runs.
- Campfire: Generates passive health regen; crucial for AFK builds where you can’t dodge.
- Idle Juice: Doubles damage while standing still. The AFK challenge’s dream item.
Mods
Modding is in early stages for Megabonk given how recently it launched, but the community has already produced a few notable projects.
The most-discussed mod is Bonk With Friends, which adds online co-op via Steam P2P lobbies. It’s unofficial and imperfect; synchronization is functional but buggy. It’s the only way to play with others until (or if) the developer adds native multiplayer.
If mods are your thing, the Megabonk Steam community hub is where that conversation lives.
Megabonk Multiplayer Tips
Megabonk is single-player only as of the current version.
The developer (Vedinad) has noted in community discussions that multiplayer is not currently planned, though it may be explored later if it fits the design. Right now, there’s no built-in co-op, online play, or PvP.
The only current way to play with others is the unofficial Bonk With Friends mod, which adds co-op via Steam P2P lobbies. Synchronization of movement and map seeds works in current versions; it’s rough around the edges and not native, so use it at your own risk.
Megabonk AFK Challenge
The AFK Gaming Challenge is exactly what it sounds like: reach the Final Swarm without moving or jumping. It’s one of the hardest challenges in the game, alongside Pacifist mode, and the community has figured out a few consistent approaches.
The core problem is XP collection. If you can’t move, most XP orbs will be out of reach unless you have Attraction Tome early.
The near-universal community advice: if you don’t get Attraction Tome by level 3-4, restart. It’s that important.
Best AFK challenge setup (community consensus from Steam discussions and multiple guides):
- Character: Megachad (Aura + Flex passive is tailor-made for this; Athena is a strong alternative because enemies pushing her toward chests via Aegis shockwave is actually useful)
- Weapons: Aura (mandatory), Aegis, Sword/Axe for knockback
- Tomes: Attraction first, then Shield, then Knockback/Projectiles for damage
- Key items: Campfire (passive regen), Idle Juice (double damage while stationary), Boss Buster
One Steam user (u/TerraSleet) put it clearly: Aegis is mandatory for punting away elites and bosses that get too close, especially the stone golem’s ground attacks.
The Attraction Tome is mandatory, or you don’t collect enough XP to reach the power level needed to survive the mid-game mini-bosses. And the RNG on your first few upgrade choices can make or break the entire run before you’ve had a chance to do anything about it.
Expect to restart frequently. That’s just how it goes.
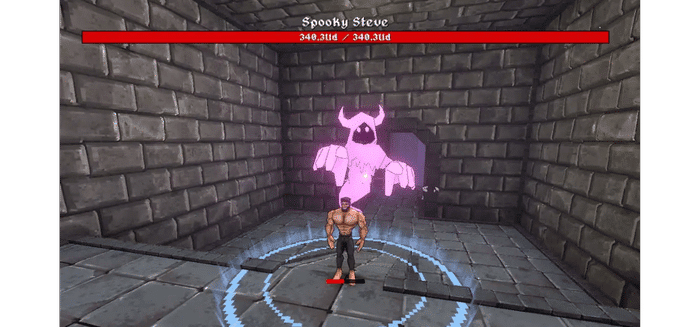
How to Beat Spooky Steve in Megabonk
Spooky Steve is a secret boss found in the Graveyard map, added in the Spooky Halloween update.
He unlocks the character Roberto and represents the hardest single-target encounter in the game by a significant margin.
His health sits at approximately 340 undecillion HP, he moves faster as the fight progresses, and a single unblocked hit will often one-shot you regardless of how tanky your build is.
Getting to Spooky Steve
You first need to unlock the Graveyard map by defeating “the undead boss” on Desert Tier 2 with Calcium.
Once unlocked, runs on Graveyard begin inside a Crypt. Collect four Crypt Keys by activating four coffins scattered across the map; each coffin spawns a boss you have to defeat to get the key.
After collecting all four, re-enter the Crypt for the second time to face Spooky Steve before the final Big Bob boss.
Fully loot the Graveyard and first Crypt before entering. Those six chests and 19 pots are a huge advantage, and players who rush the second Crypt without farming them consistently struggle in the fight.
The Core Strategy
There are two proven approaches the community has documented. Which one works depends on your build, your RNG, and how comfortable you are with the fight.
Strategy 1: Perma-Freeze (most common)
Stun Steve continuously and use Dexecutioner’s Execute ability to deal meaningful damage. Steve has so much HP that raw damage builds do nothing on their own; Execute mechanics bypass the HP scaling.
How to Beat Spooky Steve
Character
Bandit
or Athena
Bandit's Flowstate passive increases Attack Speed per level, directly scaling Dexecutioner proc rate. Athena's Aegis gives damage immunity windows as a fallback.
Weapon 1
Dexecutioner
Execute ability is the only meaningful damage source against Steve's 340 undecillion HP. Without it, the fight is unwinnable.
Weapon 2
Black Hole
Pulls Steve into position and holds him in place for freeze and Execute to land consistently.
Weapon 3
Frostwalker
Freezes Steve in place. Pairs with Duration Tome to extend stun uptime as long as possible.
Weapon 4
Dragon's Breath or Katana
Extra DPS while Steve is frozen. Either works; take whichever you can get.
Tomes
XP, Cooldown, Duration, Quantity
Duration extends the freeze window. Quantity means more projectiles proc Execute per second.
Key Items
Boss Buster, Ice Crystal, Thunder Mitts, Za Warudo
CC stacking keeps Steve frozen. Boss Buster amplifies all damage dealt. Za Warudo is a lifesaver if stun drops.
Black Hole pulls Steve into position. Frostwalker freezes him. Dexecutioner procs Execute while he’s stunned. Duration Tome extends the freeze window. Quantity Tome means more projectiles proc Execute per second. Once you cross around 20% HP removed, the rest of the fight accelerates quickly.
One community Steam guide (credited to Megabonk Reddit user Jeidoz) documented the full Bandit run and it’s the most widely replicated success strategy in the threads.
Strategy 2: Hit Negation + High DPS
Some players have beaten Steve without perma-freeze by stacking hit negation mechanics (Aegis, Kevin + Mirror, Za Warudo) to survive his one-shot hits, then dealing enough raw DPS with a maxed Dexecutioner to kill him before the fight becomes unmanageable. This requires a more developed build and better item RNG, but it’s a legitimate alternative if your freeze setup doesn’t come together.
The Part People Miss
Spooky Steve doesn’t have a fixed spawn location; you have to find him after entering the second Crypt.
He also scales in speed during the fight, so if your stun uptime drops, he will catch you. Corners and walls are dangerous; he can push you through them in some versions of the game, which counts as a death.
Megabonk Meta: What’s Working Right Now
This section is based on version 1.0.64 and community discussion through early 2026. Patch notes for the most recent updates are on the Megabonk Steam page.
The meta has gone through three distinct phases since launch:
- Launch (September 2025): Dicehead dominates at 99% leaderboard representation. Kevin + Mirror immortality exploit is functional. Joe’s Dagger uncapped, enabling absurd damage scaling.
- Post-patch (1.0.7 to 1.0.12): Immortality patched. Kevin + Mirror nerfed to “elite survivability.” XP Tome nerfed from 9% to 7% (max level 40). Joe’s Dagger capped at 2,000%. Final Swarm overhaul kills 5-hour marathon sessions. Character diversity dramatically increases.
- Current (1.0.64): Dexecutioner, Axe, and Sword builds unlocked by duration bug fix. Black Hole size increased. Bone and Shotgun received knockback and crit upgrades. Eight viable S/A-tier characters instead of one.
What’s actually working now:
- Holy Trinity (XP + Curse + Luck) remains the meta foundation for competitive runs. Standard and expected at Tier 3.
- Dicehead is still the strongest individual character, but nerfs are publicly discussed. His Gamba passive (unlimited crit via Dice) is the closest thing to a dominant solo pick in the current patch.
- Bandit has climbed significantly post-1.0.64 due to the Dexecutioner duration fix. Attack Speed scaling makes him terrifying in mid-to-late game.
- Wisp: Not a character. Wisp is an item that orbits you and fires when you do. Not currently top-tier by most accounts, but it gets mentioned in niche builds for projectile-heavy characters like CL4NK.
- Leaderboards were reset after the Kevin immortality patch and now reflect skill-based rather than exploit-based runs.
The biggest current debate in Steam discussions is whether the meta is too rigid.
One review noted the build paths feel constrained toward the Holy Trinity and specific weapon combos. It’s a fair criticism and the community is split on it.
For what it’s worth, Vedinad has been responsive to feedback throughout; this game shipped at $10 and has already received multiple substantial free content updates.
FAQ
Here are some frequently asked questions I stumbled upon while researching this topic and writing the guide.
What Is Megabonk?
Megabonk is a 3D roguelite auto-shooter developed by solo developer Vedinad, released on Steam on September 18, 2025.
Players navigate procedurally generated 3D maps with verticality, fighting waves of enemies while automatically attacking and selecting random upgrades to build out a character.
It’s best described as Vampire Survivors meets Risk of Rain 2; same auto-combat bullet heaven loop, but with 3D movement, sliding, jumping, and speed boosts for positioning.
It sold over one million copies in two weeks and peaked at 117,336 concurrent players.
Is Megabonk Multiplayer?
No, Megabonk is currently single-player only, and the developer has said multiplayer is not planned for the near future, though it may be explored later.
An unofficial community mod called “Bonk With Friends” adds experimental Steam P2P co-op, but it’s not native and has synchronization issues.
What Is the Best Build in Megabonk?
The most universally recommended meta build is the Holy Trinity (XP Tome + Curse Tome + Luck Tome) as your tome foundation, paired with your character’s core weapon and passive-synergistic items.
For beginners, skip the Holy Trinity and run a defensive build with Aura or Aegis and Shield or HP Tomes until you’re comfortable.
For leaderboard runs, Holy Trinity + Dicehead or Bandit with Dexecutioner is the current community answer.
What Is the Best Character in Megabonk?
Dicehead is the strongest character in the current patch. His Gamba passive lets Dice rolls of 6 permanently increase crit chance, and that stacks indefinitely.
CL4NK, Robinette, and Megachad are strong alternatives with more consistent (and less RNG-dependent) scaling.
For beginners, Sir Oofie and Fox are the community’s top recommendations.
What Platforms is Megabonk On?
Megabonk is available on PC (Windows and Linux) via Steam. There are no console or mobile versions currently planned.
The developer has mentioned console and Steam Deck compatibility as potential future considerations, but nothing is confirmed.
How Do You Beat Spooky Steve in Megabonk?
The most common community approach: use Bandit or Athena, equip Dexecutioner, Black Hole, and Frostwalker, and run Cooldown, Duration, Quantity, and XP Tomes.
Grab Boss Buster and as many CC items (Ice Crystal, Thunder Mitts, Za Warudo if you can find it) as possible. Black Hole pulls Steve into position, Frostwalker freezes him, and Dexecutioner’s Execute ability deals the primary damage against his 340 undecillion HP.
Some players have also beaten him using hit negation builds (Kevin + Mirror, Aegis, Za Warudo) with high raw DPS. See the full breakdown in the Spooky Steve section above.
Is Megabonk on Xbox?
No, Megabonk is not currently available on Xbox. It is PC-only (Windows and Linux via Steam) at the time of writing.
The developer has mentioned console support as a potential future consideration, but nothing has been confirmed or announced.
Is Megabonk on PS5?
No, Megabonk is not on PS5. There is no PlayStation version currently planned.
If console support is added in the future, Vedinad has said it may be explored; check the Megabonk Steam page for official announcements.
Is Megabonk on Console?
Megabonk is not currently available on any console. It is a PC-exclusive title (Windows and Linux) as of the current version.
Console and Steam Deck compatibility have been mentioned as possibilities, but no release date or platform announcement has been made.
Is Megabonk Free?
No, Megabonk is not free. It is priced at $9.99 on Steam.
A free demo is available on Steam, which gives you a limited slice of the game to test performance and core combat before buying.
How Much Is Megabonk?
Megabonk costs $9.99 on Steam. There are no paid editions, DLC, or microtransactions.
The developer has run introductory discounts at launch; check the Steam page for current pricing in your region.
Who Made Megabonk?
Megabonk was made by a solo developer who goes by Vedinad. The entire game was built by one person.
It was released on September 18, 2025 and sold over one million copies in its first two weeks, making it one of the most successful solo indie launches of 2025.
What Does Difficulty Do in Megabonk?
Difficulty in Megabonk (increased primarily through the Curse Tome and Difficulty shrines) raises enemy spawn rate, enemy HP, and damage, while significantly improving drop quality and upgrade rarity.
The tradeoff is the core of high-level play: harder difficulty means better loot, but you need the build foundation to survive long enough to benefit from it.
What Does Luck Do in Megabonk?
Luck improves the quality of upgrade choices at every level-up, increasing the chances of seeing Epic and Legendary options instead of Common and Rare ones.
It’s one of the highest-priority stats in the game.
What Does Size Do in Megabonk?
Size increases the radius of weapon effects and AoE attacks.
For characters like Noelle whose Frostwalker ring scales with size, it’s a core stat; for others, it’s a secondary quality-of-life upgrade.
The Size Tome is particularly important for Aura and Megachad builds, where a wider damage field covers more ground without requiring active positioning.
How Do You Get The Hero Sword in Megabonk?
The Hero Sword is an unlockable weapon, not available by default. It can be unlocked through the Silver shop or specific quest/challenge completion; check the in-game Unlocks tab for the exact current requirement.
Once unlocked, it appears in your regular weapon rotation during runs.
Note that it’s a B-tier weapon at best; the slow attack rate limits its synergy with most builds. See the Hero Sword section above for the full breakdown.
What Does Bloodmark Do in Megabonk?
Bloodmark is a debuff applied to enemies that lowers their execution threshold, making Dexecutioner’s Execute proc trigger at a higher HP percentage rather than waiting for enemies to be nearly dead.
It’s applied by the item Unstable Transfusion and is particularly important for the Spooky Steve fight, where getting Execute to proc earlier is the difference between winning and losing. See the Bloodmark section above for more detail.
Wrapping Up
Megabonk is the kind of game that snuck up on the entire roguelite community at once.
If you’re looking for more context on where it sits in the genre, my Roguelike vs. Roguelite breakdown and Bullet Heaven vs. Bullet Hell guide both cover the genre that made Megabonk possible.
And if you want a list of games to play when you eventually need a break from bonking, my Games Like Brotato article covers the genre’s best by real community vote count.
If you’ve beaten Spooky Steve or cracked a build that doesn’t show up here, let me know. The community’s figured out some genuinely weird solutions, and I’d rather hear about them than miss them.
Take care and talk soon 🙂